
Lifty Fifty Training Library / Movement reference
Conventional Deadlift
A barbell lift from the floor to standing. Follow the starting position, the pull and the return, then look at the muscles and joints involved.
- Movement pattern
- Hinge
- Movement type
- Compound · Bilateral
- Equipment & setup
- Barbell
Movement demonstration
Silent videoThe video could not load. Open the video directly or continue with the written reference below.
Movement anatomy
Rendered 3D views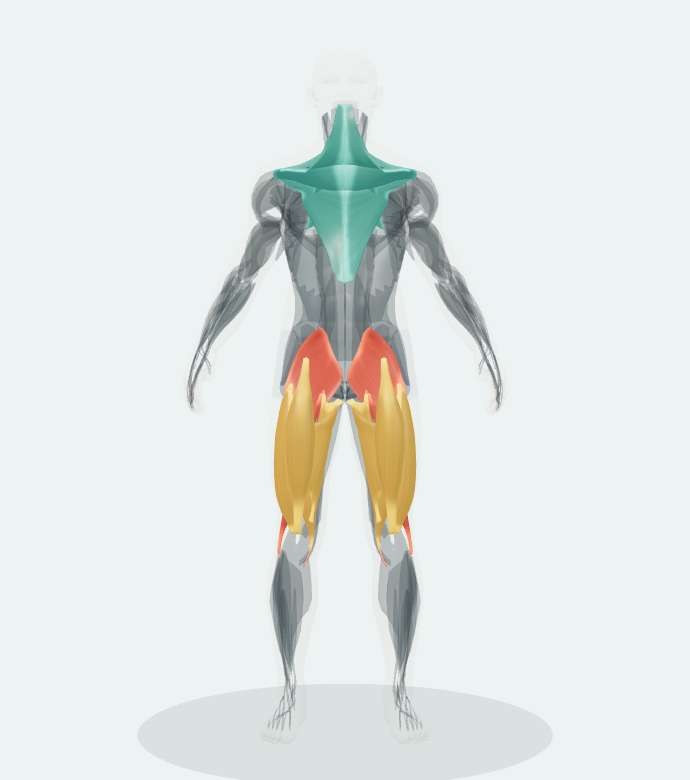
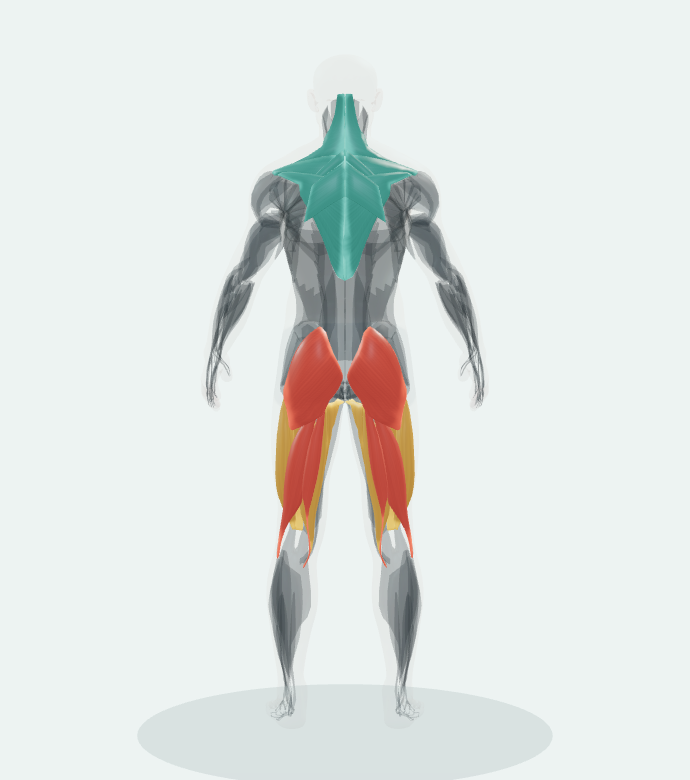
- Primary
- Glutes · Hamstrings
- Secondary
- Spinal Extensors · Quadriceps Complex · Hip Adductors
- Stabilising
- Upper Back · Forearm
Selected muscles; full roles below. Not measured activation. Read muscle references
Movement profile
Classification and movement demands.
- Category
- Strength Powerlifting
- Movement pattern
- Hinge
- Movement family
- Deadlift
- Movement type
- Compound
- Laterality
- Bilateral
- Plane of movement
- Sagittal
- Body position
- Bent Over
- Grip
- Mixed
- Technical demand
- Intermediate
- Balance demand
- Low
Setup
Setup requirements.
Stand with feet hip-width apart, shins approximately one inch from the bar. Hinge at the hips and bend the knees to grip the bar just outside the legs with a double overhand, mixed, or hook grip. Drop the hips until the shins touch the bar, chest up, shoulders directly over or slightly in front of the bar. Pull slack out of the bar by engaging the lats and bracing the trunk hard before initiating the pull.
Use a level lifting area and check the starting height of the bar. The grip, bar position and distance from your legs are useful details to review between sets.
Equipment and optional accessories
Equipment & setup
Barbell
Equipment group
Free Weight
Optional accessories
Lifting Belt · Wrist Straps · Chalk
Execution
Execution phases.
Initial pull (floor to knee)
Drive through the full foot to extend the knees while maintaining a constant back angle. The bar travels vertically, staying in contact with the shins. The quads do most of the work in this phase while the erector spinae holds the spine rigid. Do not let the hips shoot up faster than the shoulders.
Second pull (knee to lockout)
Once the bar passes the knees, aggressively extend the hips by driving them forward. The glutes and hamstrings become the primary movers. The back angle opens as the torso approaches vertical. Squeeze the glutes at the top and stand fully erect with shoulders back and hips locked. Do not hyperextend the lumbar spine at lockout.
Descent
Reverse the movement by pushing the hips back first, allowing the bar to travel down the thighs. Once the bar passes the knees, bend the knees to lower it to the floor. Maintain the brace throughout. Control the descent — do not drop the bar from lockout.
Breathing and bracing
Take a breath and brace before initiating the pull. Maintain the brace through the lift to lockout, then exhale once standing. Reset your breath and brace before the next repetition.
These notes describe this reference example. Follow the movement variation, range, tempo and effort instructions in your own programme.
Coaching
Coaching cues and common errors.
Coaching cues
- Push the floor away with your legs
- Squeeze the bar like you are trying to bend it around your shins
- Chest up, lats tight — protect your back before you pull
- Drive your hips to the bar once it passes the knees
- Stand tall and lock out — glutes tight, shoulders back
Common mistakes to look for
- Rounding the lower back during the pull (lumbar flexion under load)
- Hips shooting up before the chest, turning the lift into a stiff-leg pull
- Bar drifting forward away from the body mid-pull
- Jerking the bar off the floor instead of building tension gradually
- Hyperextending the lower back at lockout by leaning backward
Muscle roles
Muscle roles in the movement.
Reference roles describe how muscles contribute to the movement. They do not measure your personal activation or growth.
- Primary muscle groups
- Glutes · Hamstrings
- Secondary muscle groups
- Spinal Extensors · Quadriceps Complex · Hip Adductors
- Stabilising muscle groups
- Upper Back · Forearm
Scroll across to view all columns
| Muscle | Role | Region |
|---|---|---|
| Gluteus Maximus | Primary | — |
| Biceps Femoris | Primary | Long Head |
| Semitendinosus | Primary | — |
| Semimembranosus | Secondary | — |
| Iliocostalis | Secondary | — |
| Longissimus | Secondary | — |
| Spinalis | Secondary | — |
| Rectus Femoris | Secondary | — |
| Vastus Lateralis | Secondary | — |
| Vastus Medialis Oblique | Secondary | — |
| Vastus Intermedius | Secondary | — |
| Adductor Magnus | Secondary | — |
| Trapezius | Stabiliser | Upper |
| Trapezius | Stabiliser | Middle |
| Rhomboid Major | Stabiliser | — |
| Rhomboid Minor | Stabiliser | — |
| Lumbar Multifidus | Stabiliser | — |
A muscle can have separate entries for different regions or roles.
Open the 3D anatomy referenceJoint context
Joints involved in the movement.
The reference connects this lift to lumbar spine, hip, knee, wrist regions. This adds context to the setup and execution notes.
Reference ratings are authored classifications for this movement. They do not measure your joint loading or predict your individual injury risk.
Scroll across to view all columns
| Joint group | Reference rating | Load mechanisms |
|---|---|---|
| Lumbar Spine | High | Axial Loading, Shear, Compression |
| Hip | Moderate | Compression, End Range |
| Knee | Low | Compression |
| Wrist | Low | Compression |
Scroll across to view all columns
| Joint / structure | Reference rating | Load mechanisms |
|---|---|---|
| Intervertebral Disc | High | Axial Loading, Shear, Compression |
| Lumbosacral Joint | Moderate | Shear, Compression |
| Hip Joint | Moderate | Compression, End Range |
| Knee Joint | Low | Compression |
| Radiocarpal Joint | Low | Compression |
Adults over 50
Over-50s considerations
These are general notes from the movement reference. They do not assess whether this movement is suitable for you.
Possible modifications
- Use a trap bar (hex bar) to reduce lumbar demand and allow a more upright torso
- Elevate the bar on blocks or use bumper plates to reduce the range of motion if hip or hamstring flexibility is limited
- Start with lighter loads to establish a solid hip hinge pattern before progressing
- Use lifting straps if grip is a limiting factor to avoid compensating with a rounded back
Contraindications noted in the reference
- Acute lumbar disc herniation or active radiculopathy
- Severe spinal stenosis with flexion-intolerant symptoms
- Uncontrolled hypertension (due to significant breath-holding demand under heavy load)
- Recent hip replacement where end-range hip flexion is restricted
Easier variations
- Trap bar deadlift
- Romanian deadlift (light load)
- Block pull (elevated start)
More demanding variations
- Deficit deadlift
- Pause deadlift (off the floor)
- Sumo deadlift
Programming
Load, effort and tempo.
Ways to specify intensity
- Percentage of 1RM
- Rating of Perceived Exertion (RPE)
- Repetitions in Reserve (RIR)
- Absolute load (kg)
The programme specifies the load or effort target for each set. These are the intensity formats associated with this movement.
Reference tempo: 2-0-2-1
- Lowering
- 2 seconds
- Bottom pause
- 0 seconds
- Lifting
- 2 seconds
- Top pause
- 1 seconds
Tempo notation lists lowering, bottom pause, lifting and top pause, in that order. The deadlift starts with the lifting phase. This is the library's reference tempo; follow any different tempo specified in the programme.
Read the RIR referenceNames and terminology
Indexed movement names.
The library indexes common names alongside equipment and grip labels. Equipment and grip variants can change the setup and mechanics of the lift.
Scroll across to view all columns
| Name | Name type | Context |
|---|---|---|
| Conventional DL | Abbreviation | General |
| Barbell Deadlift | Synonym | General |
| Standard Deadlift | Synonym | General |
| Conventional Deadlift (Olympic Bar) | Attachment | Olympic Bar |
| Conventional Deadlift (Snatch Grip) | Grip | Snatch |
| Conventional Deadlift (Overhand) | Grip | Pronated |
Alternatives
Movement alternatives and substitutions.
Equipment, setup and programme intent can all affect your choice. These examples change aspects of the lift; compare them before substituting.
Block Pull
Raise the bar on blocks to change the starting height and range of the pull.
Sumo Deadlift
Use a wider stance with the hands inside the legs. The starting position and lift mechanics change.
Trap Bar Deadlift
Stand inside a trap bar and use its side handles. Handle height and available equipment affect the setup.
All 12 related movements
These are the relationships listed in the movement reference. A regression or progression changes the task; suitability also depends on the load, equipment and programme.
Scroll across to view all columns
| Movement | Relationship | Considerations |
|---|---|---|
| Barbell Clean Pull | Alternative | Goal, Skill |
| Leg Press (45-Degree) | Alternative | Equipment, Joint Load |
| Deficit Conventional Deadlift | Progression | Range Of Motion, Difficulty |
| Block Pull | Regression | Range Of Motion, Difficulty |
| Rack Pull | Regression | Range Of Motion, Difficulty |
| Trap Bar Deadlift (High Handle) | Regression | Difficulty, Range Of Motion, Joint Load |
| KB Deadlift | Regression | Equipment, Difficulty, Skill |
| Tempo Deadlift | Variation | Goal |
| Pause Deadlift | Variation | Goal |
| Barbell Romanian Deadlift | Variation | Goal, Range Of Motion |
| Sumo Deadlift | Variation | Goal |
| Trap Bar Deadlift | Variation | Equipment, Joint Load |
Your training / Example
Conventional Deadlift: training record.
Sample data · 14 Jul–1 Sep 2026
An illustrative record of eight sessions. Every total and estimate below comes from the working sets shown in the history.
- Best estimated 1RM
- 113.8 kg From 97.5 kg × 5
- Heaviest working set
- 97.5 kg 5 repetitions
- Sessions recorded
- 8 24 working sets · 120 reps
- Total volume load
- 10,425 kg-reps · working sets only
Estimated 1RM
Best set estimate per session · kg
A lighter session lowers the set-based estimate; it does not establish a loss of strength.
How this example estimates 1RM
This demonstration uses the Epley formula: load × (1 + repetitions ÷ 30), taking the highest set estimate in each session. It is an approximation based on the recorded load and reps; it does not adjust for the recorded reps in reserve.
These estimates are not tested single-repetition lifts, a training max or an individual prediction. The goal is also an example.
Session history
Expand a session to review every working set and its notes.
1 Sept Strength session 3 × 5 at 97.5 kg 1,462.5 kg-reps 113.8 kg Set detail +
| Set | Load | Reps | RIR | Volume (kg-reps) |
|---|---|---|---|---|
| 1 | 97.5 kg | 5 | 2 | 487.5 |
| 2 | 97.5 kg | 5 | 2 | 487.5 |
| 3 | 97.5 kg | 5 | 1 | 487.5 |
Session note Reset the starting position between repetitions. Final set felt more demanding.
25 Aug Strength session 3 × 5 at 95 kg 1,425 kg-reps 110.8 kg Set detail +
| Set | Load | Reps | RIR | Volume (kg-reps) |
|---|---|---|---|---|
| 1 | 95 kg | 5 | 2 | 475 |
| 2 | 95 kg | 5 | 2 | 475 |
| 3 | 95 kg | 5 | 1 | 475 |
18 Aug Strength session 3 × 5 at 90 kg 1,350 kg-reps 105 kg Set detail +
| Set | Load | Reps | RIR | Volume (kg-reps) |
|---|---|---|---|---|
| 1 | 90 kg | 5 | 2 | 450 |
| 2 | 90 kg | 5 | 2 | 450 |
| 3 | 90 kg | 5 | 1 | 450 |
11 Aug Lighter session 3 × 5 at 75 kg 1,125 kg-reps 87.5 kg Set detail +
| Set | Load | Reps | RIR | Volume (kg-reps) |
|---|---|---|---|---|
| 1 | 75 kg | 5 | 4 | 375 |
| 2 | 75 kg | 5 | 4 | 375 |
| 3 | 75 kg | 5 | 4 | 375 |
Session note Planned lighter week. Kept the same range of motion.
4 Aug Strength session 3 × 5 at 90 kg 1,350 kg-reps 105 kg Set detail +
| Set | Load | Reps | RIR | Volume (kg-reps) |
|---|---|---|---|---|
| 1 | 90 kg | 5 | 2 | 450 |
| 2 | 90 kg | 5 | 2 | 450 |
| 3 | 90 kg | 5 | 1 | 450 |
28 Jul Strength session 3 × 5 at 85 kg 1,275 kg-reps 99.2 kg Set detail +
| Set | Load | Reps | RIR | Volume (kg-reps) |
|---|---|---|---|---|
| 1 | 85 kg | 5 | 2 | 425 |
| 2 | 85 kg | 5 | 2 | 425 |
| 3 | 85 kg | 5 | 1 | 425 |
21 Jul Strength session 3 × 5 at 82.5 kg 1,237.5 kg-reps 96.3 kg Set detail +
| Set | Load | Reps | RIR | Volume (kg-reps) |
|---|---|---|---|---|
| 1 | 82.5 kg | 5 | 2 | 412.5 |
| 2 | 82.5 kg | 5 | 2 | 412.5 |
| 3 | 82.5 kg | 5 | 1 | 412.5 |
14 Jul Strength session 3 × 5 at 80 kg 1,200 kg-reps 93.3 kg Set detail +
| Set | Load | Reps | RIR | Volume (kg-reps) |
|---|---|---|---|---|
| 1 | 80 kg | 5 | 2 | 400 |
| 2 | 80 kg | 5 | 2 | 400 |
| 3 | 80 kg | 5 | 1 | 400 |
Fictional training history for this website preview. These examples illustrate the training-record experience; they are not a programme recommendation or reported member results.